Instalar y configurar varnish 4 en digitalocean ⚡!!
Que es Varnish Cache
Varnish Cache es un acelerador de aplicaciones web, también conocido como caché de proxy HTTP inversa. Se instala delante de cualquier servidor HTTP y se configura para almacenar en el caché del servidor una copia del recurso solicitado.
En este vídeo podemos ver mas a detalle que es varnish-cache
Instalacion de Varnish-cache
1.- Creamos un nuevo servidor el cual va a tener varnish al cual llamaremos VPS_varnish y el servidor con nuestra pagina web le llamaremos VPS_lamp
2.- Debemos habilitar nuestras ip privadas como se muestra aqui
3.- Actualizamos e instlamos varnish 4 asi:
sudo apt-get install apt-transport-https
sudo curl https://repo.varnish-cache.org/ubuntu/GPG-key.txt | apt-key add -
echo "deb https://repo.varnish-cache.org/ubuntu/ trusty varnish-4.0" >> /etc/apt/sources.list.d/varnish-cache.list
sudo apt-get update
sudo apt-get install varnish
Y verificamos la version asi:
varnishd -V4.- Miramos la pagina a nuestro servidor VPS_varnish asi poniendo la ip y el puero 6081
http://Public_IP_VPS_varnish:6081Nos debe mostrar esto

Eso significa que varnish ya esta trabajando pero no ha visto ningun servidor.
Para decirle a varnish de que servidor va a jalar los datos de la pagina tenemos que editar el archivo default.vcl
sudo vim /etc/varnish/default.vclY vamos a ver esto
backend default {
    .host = "127.0.0.1";
    .port = "8080";
}
Y lo cambiamos por esto
backend default {
    .host = "IP_Privada_VPS_lamp";
    .port = "80";
}
include "custom.vcl";
sudo vim /etc/varnish/custom.vcldentro de custom.vcl colocamos el siguiente este contenido (recuerda cambiar dominio.com por tu dominio)
5.- Configuramos varnish para que sirva la informacion atraves del puerto 80 asi como lo hace apache o ngix asi:
sudo vim /etc/default/varnishBusamos una linea asi
DAEMON_OPTS="-a :6081 Y la cambiamos por esta:
DAEMON_OPTS="-a :80 A partir de ubuntu 15 tambien debemos editar este archivo
vim /lib/systemd/system/varnish.service
Donde cambiamos esta linea
ExecStart=/usr/sbin/varnishd -a :6081 -T localhost:6082 -f /etc/varnish/default.vcl -S /etc/varnish/secret -s malloc,256m
por esta
ExecStart=/usr/sbin/varnishd -a :80 -T localhost:6082 -f /etc/varnish/default.vcl -S /etc/varnish/secret -s malloc,256m
Y reiniciamos vernish
sudo service varnish restart
6.- En nuestro servidor VPS_lamp debemos editar nuestro virtualhost de nuestra pagina de tal suerte que envie su informacion al servidor VPS_varnish y esto lo logramos editando el virtualhost de nuestro servidor VPS_lamp asi
sudo vim /etc/apache2/sites-available/virtualhost_dominio.conf
Donde vamos a buscar esta linea
<VirtualHost IP_Publica_VPS_lamp:80>
y la cambiamos por esta
<VirtualHost IP_Privada_VPS_Lamp:80>
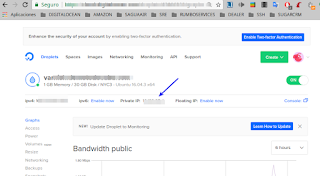
Esa ip privada la podemos ver haciendo click en el droplet y se muestra esto:
Reiniciamos apache
sudo service apache2 restart
7.- Habilitamos varnish para https, para esto debemos instalar nginx en nuestro VPS_varnish asi
sudo apt-get install nginx8.- Instalamos y configuramos letsencrypt en VPS_varnish asi:
sudo add-apt-repository ppa:certbot/certbot
sudo apt-get update
sudo apt-get install python-certbot-nginx
Editamos el archivo default de ngix asi
sudo vim /etc/nginx/sites-available/default
Buscamos este texto
server_name _;Y sustituimos _ por el nombre del dominio
server_name example.com www.example.com;Verificamos la sintaxis de nuestro virtualhost asi:
sudo nginx -t
Reiniciamos nginx
sudo service nginx restart
Obtenemos los certificados de letsencrypt pero agregamos –test-cert para probar que si se pueda sertificar nuestro dominio.
sudo certbot --nginx -d example.com -d www.example.com --test-cert
En caso de que se muestre este error
Client with the currently selected authenticator does not support any combination of challenges that will satisfy the CA.
Podemos usar la alternativa que se muestra en este tutorial
Si al final obtines un resultado asi significa que si es posible certificar nuestro dominio.
Output

IMPORTANT NOTES:
 - Congratulations! Your certificate and chain have been saved at
   /etc/letsencrypt/live/example.com/fullchain.pem. Your cert will
   expire on 2017-10-23. To obtain a new or tweaked version of this
   certificate in the future, simply run certbot again with the
   "certonly" option. To non-interactively renew *all* of your
   certificates, run "certbot renew"
 - Your account credentials have been saved in your Certbot
   configuration directory at /etc/letsencrypt. You should make a
   secure backup of this folder now. This configuration directory will
   also contain certificates and private keys obtained by Certbot so
   making regular backups of this folder is ideal.
 - If you like Certbot, please consider supporting our work by:

   Donating to ISRG / Let's Encrypt:   https://letsencrypt.org/donate
   Donating to EFF:                    https://eff.org/donate-le
Pero por haber usado –test-cert en realidad no esta certificado, para implementar el certificar debemos poner –force-renew asi:
sudo certbot --nginx -d example.com -d www.example.com --force-renew
Si vamos a SSL Labs Server Test y ponemos nuestro dominio, vamos a ver una B porque faltan los parametros del demonio, para solucionar este detalle hay que hacer los iguiente:
sudo openssl dhparam -out /etc/ssl/certs/dhparam.pem 2048
Editamos de nuevo el virtualhost default de nginx
sudo vim /etc/nginx/sites-available/default
Ahi colocamos en cualquier parte dentro del bloque server{}
ssl_dhparam /etc/ssl/certs/dhparam.pem;
De nuevo revisamos la sintaxis del virtualhost default
sudo nginx -t
Reiniciamos ngixn
sudo service nginx restart
9.- Configuramos la auto renovación:
Abrimos el crontab asi
sudo crontab -e
Agregamos esta siguiente linea
15 3 * * * /usr/bin/certbot renew --quiet
10.- Editamos el archivo
vim /etc/nginx/sites-available/default
De tal suerte que quede asi
server {
        listen 443 ssl default_server; # managed by Certbot
        server_name ejemplo.com www.ejemplo.com;
        ssl_certificate /etc/letsencrypt/live/ejemplo.com/fullchain.pem; # managed by Certbot
        ssl_certificate_key /etc/letsencrypt/live/ejemplo.com/privkey.pem; # managed by Certbot
        include /etc/letsencrypt/options-ssl-nginx.conf; # managed by Certbot
        ssl_dhparam /etc/letsencrypt/ssl-dhparams.pem; # managed by Certbot

        location / {
            proxy_pass http://127.0.0.1:80;
            proxy_set_header X-Real-IP  $remote_addr;
            proxy_set_header X-Forwarded-For $proxy_add_x_forwarded_for;
            proxy_set_header X-Forwarded-Proto https;
            proxy_set_header X-Forwarded-Port 443;
            proxy_set_header Host $host;
        }

}
Reiniciamos ngixn
sudo service nginx restart
Reiniciamos varnish
sudo service varnish restart
11.- Configurando varnish con wordpress
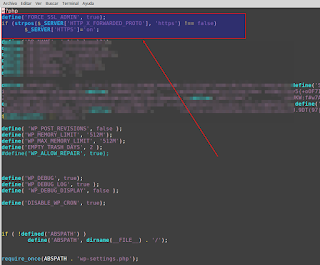
En el caso del wp-admin de wordpress es importante aclarar que puede llegar a dar el problema de loop de redirecciones para evitar esto hay que agregar en el wp-config.php esta linea de codigo:
define('FORCE_SSL_ADMIN', true);
if (strpos($_SERVER['HTTP_X_FORWARDED_PROTO'], 'https') !== false)
       $_SERVER['HTTPS']='on';
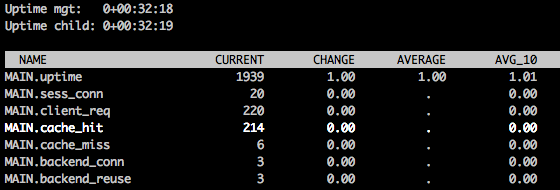
12.- Ahora podemos ver las estadisticas de varnish asi
varnishstat
Miraras algo como esto:

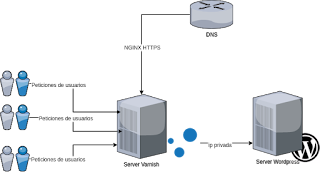
Diagrama final de nuestro varnish-cache y wordpress

echo | openssl s_client -connect dominio.com:443 -servername nombre_del_servidor 2>/dev/null | openssl x509 -noout -dates
Si tenemos acceso al servidor varnish podemos ejecutar este comando
ssl-cert-check -c /etc/letsencrypt/live/dominio.com/cert.pem


